


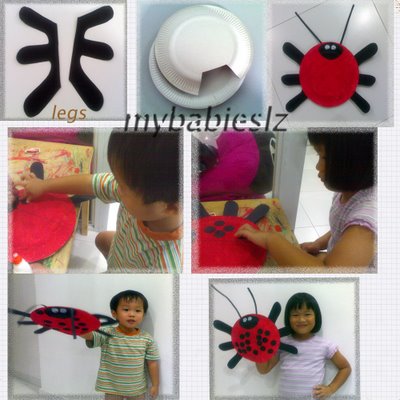
Paper Plate Ladybug Puppet Craft
Got the idea from here
-Two paper plates for each ladybug
-Scissors
-Stapler or tape (colored tape looks really nice but is not necessary)
-Red and black paint, markers or crayons (We used poster colours)
-Glue
-Black construction paper
-Optional - googly eyes (I used white paint for the eyes)
 1) Using black construction paper, cut out the ladybug's legs (cut two sets of three legs).
2) We painted the plates befor we staple it. Paint the top of the ladybug red (except the head, which is black). Paint the bottom of the ladybug black.
3) Staple (or tape) two paper plates together (put the eating surfaces of the plates on the inside) - make sure to staple the legs between the plates. Don't staple the plates all the way round - leave one end of the ladybug unstapled. I cut 2 long strips for antennae, staple it.
4) They glued the dots on the ladybugs. (we used the constuction paper for the dots)
Both my children enjoyed doing it and hope you enjoy doing it too!
After painting the plates (while waiting for the plates to dry), we went for japanese food which is my favourite and take a walk at the pasar malam. After that we came home to finish the project.
![]()


2 comments:
so pretty, can't wait to let the kids try it out...thanks for the idea....
U're melcome! I'm sure your Rays will enjoy it!
Post a Comment